
5 lessons I learned making my first zine

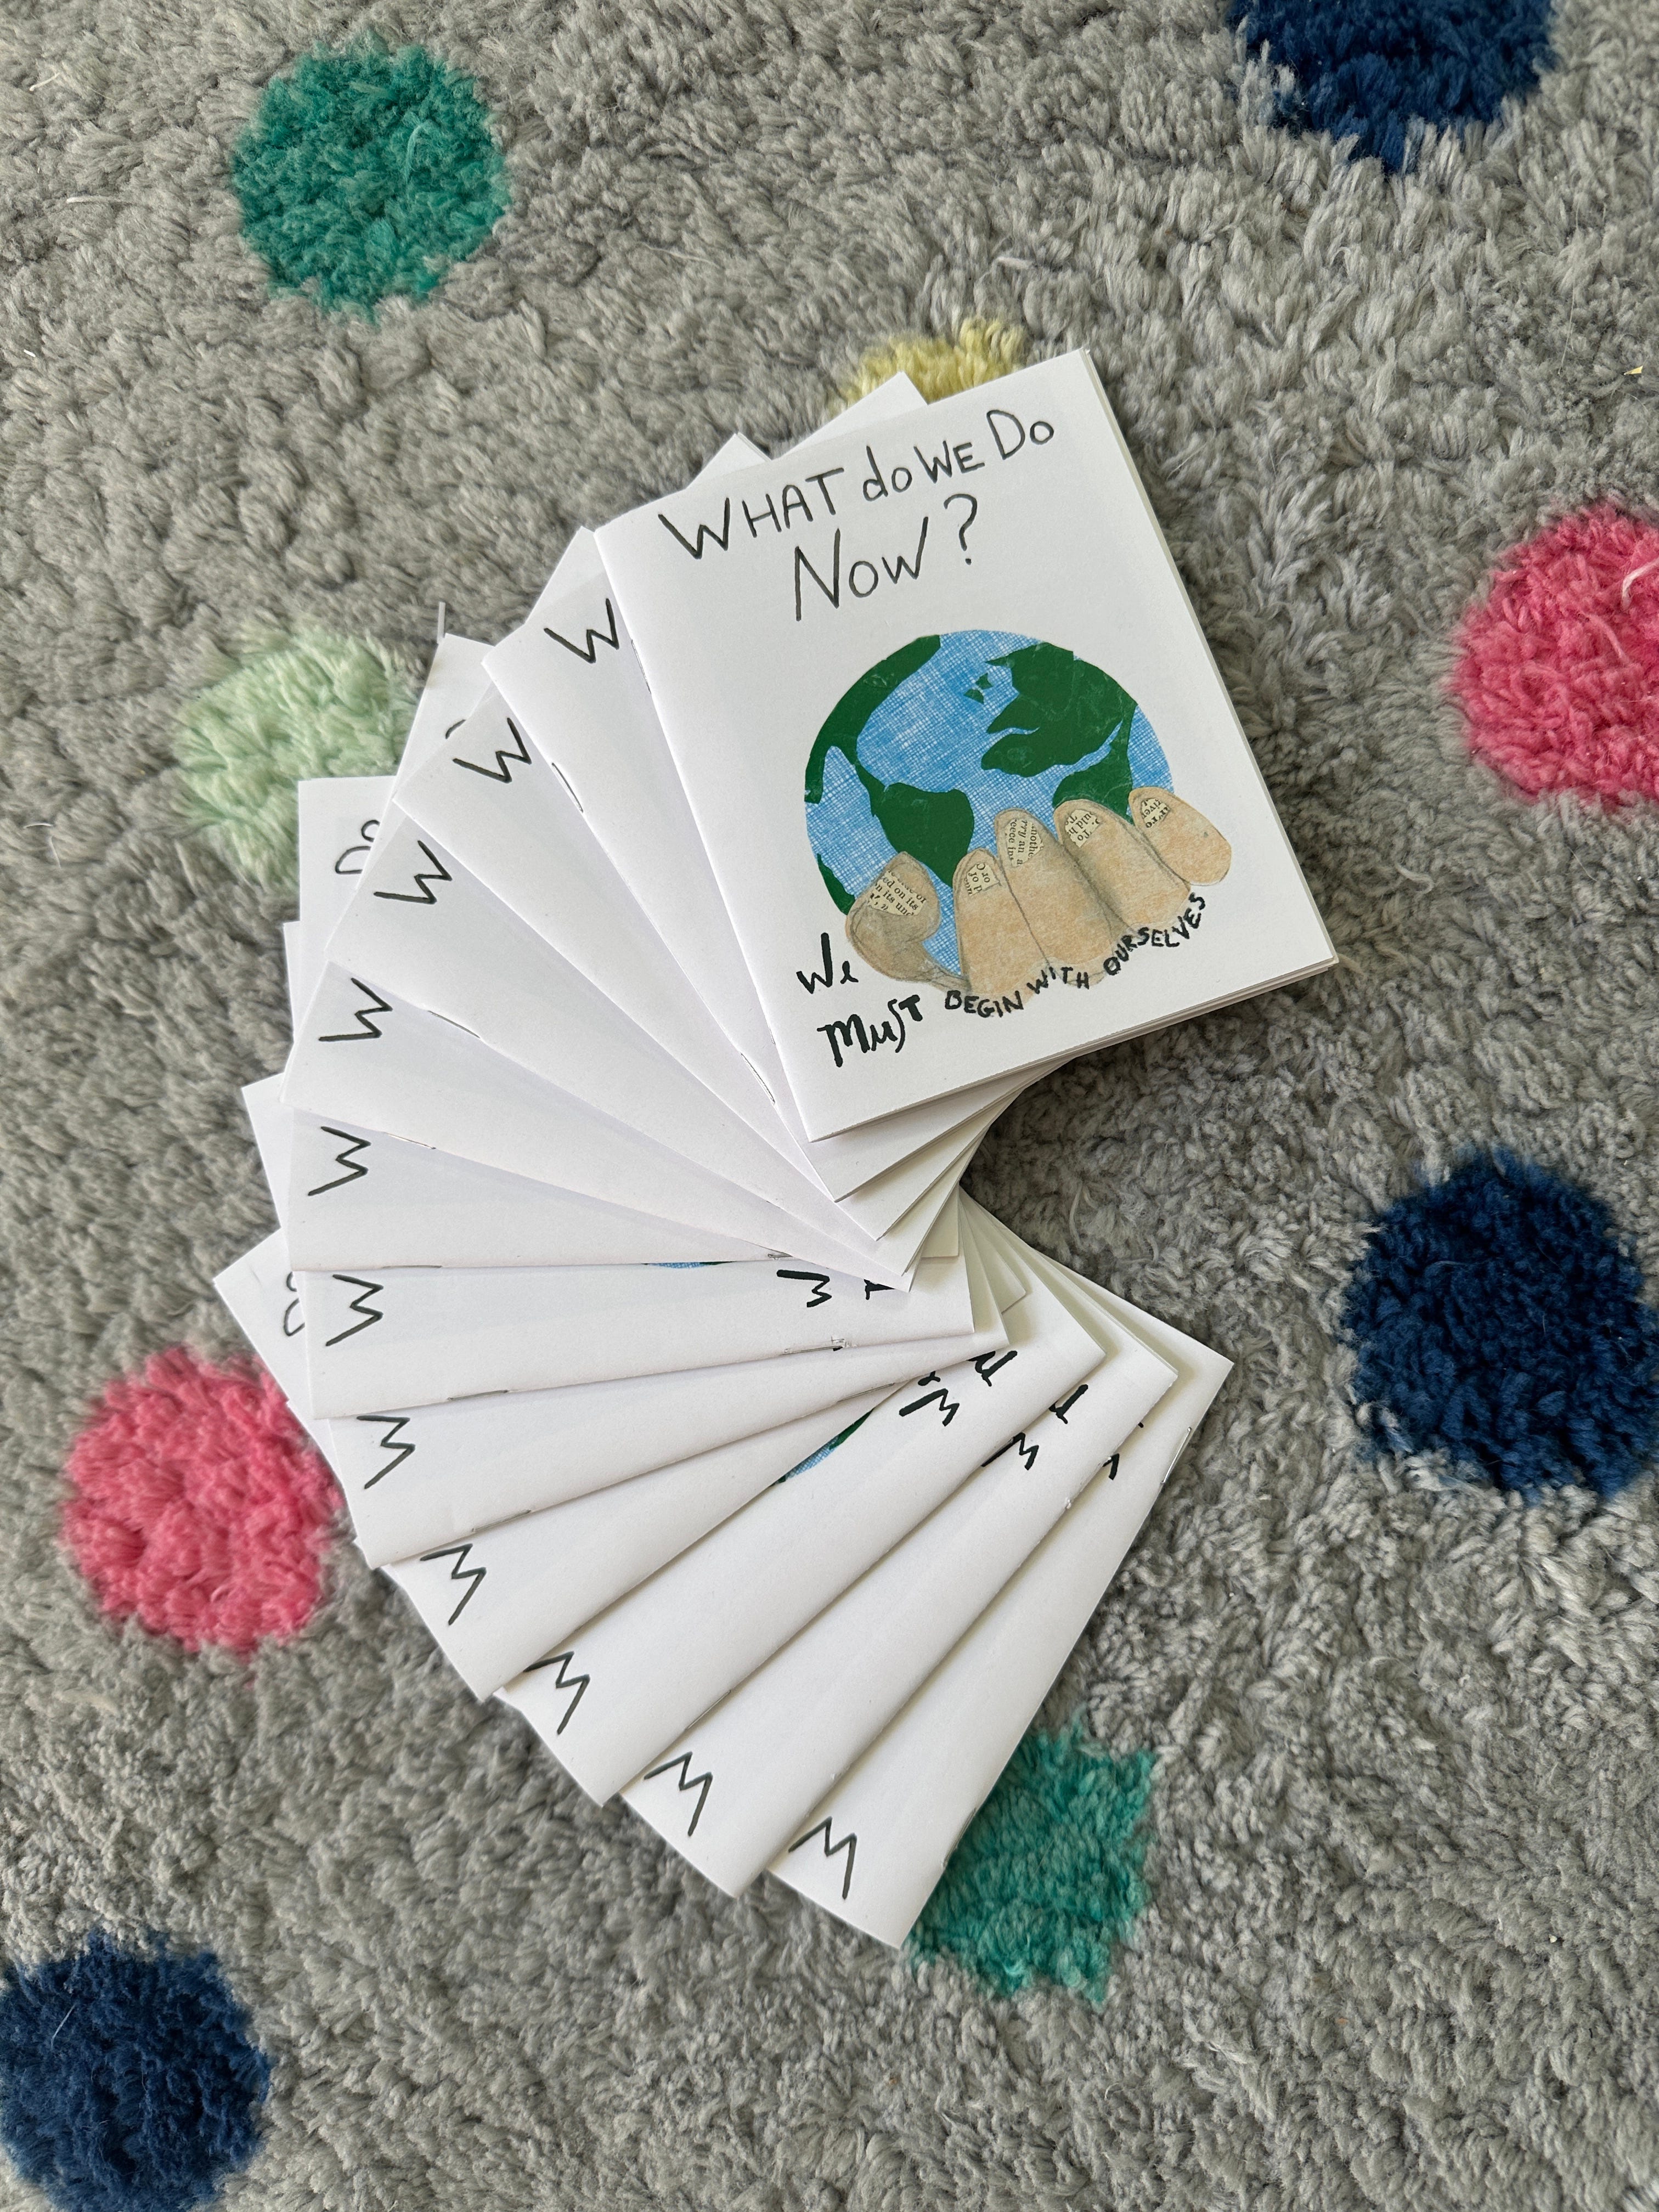
So I love my first zine. I collaged all the pages, I hand lettered key phrases, I said something true. And I love the idea of people holding it their hands and flipping through the pages. Really, it turned out even better than I imagined.
And I made so many mistakes! I started calling it a monster project midway through because, well, it was a monster! I even lost some sleep to it. (I think I got a little obsessed).
Now that I’m on the other side, I can see so clearly the mistakes I could have avoided and that’s why I’m here today. To share my mistakes so you can avoid them yourself—and also, selfishly, so I will remember exactly not what to do the next time. More sleep for both of us.
First, a short zine gush
Before I launch into it, though, I do want to stop and just acknowledge what feels like a zine awakening at this time in history and how jazzed I’m feeling about being a part of it. Zines are not new, of course. People have been bypassing mainstream gatekeepers and self publishing their own ideas and experiences well over 100 years—and certainly in the last several decades.
Today, in our present crazy time, a renewed zine movement is surging, and I agree with Rachel Moss. There’s a good reason we are turning to zines:
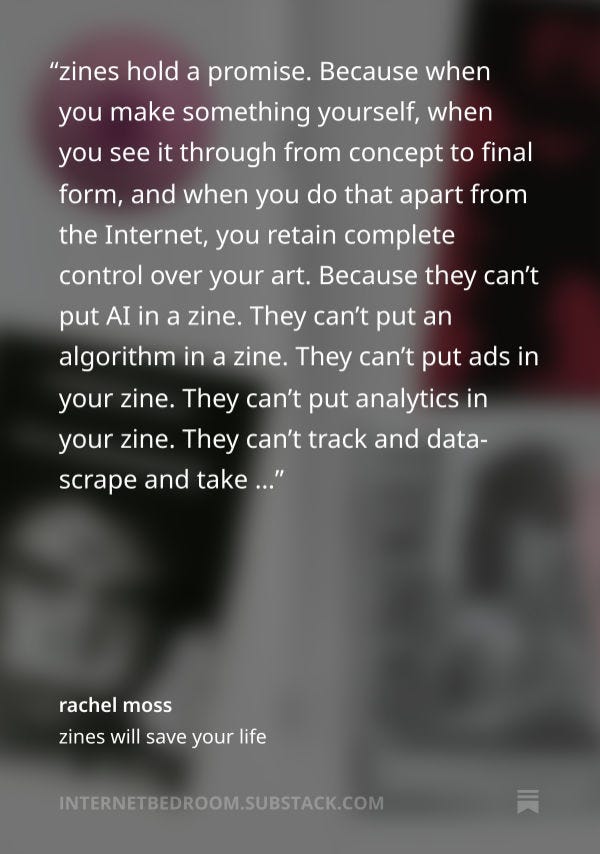
I love this post from Moss—go read it yourself right now! You’ll find good advice for how to make a zine (most of which I failed to do as you’ll see below) and also so many links to others writing about zines.

I recently tossed off a definition of zines in a comment to Adam Ming in Substack Notes:
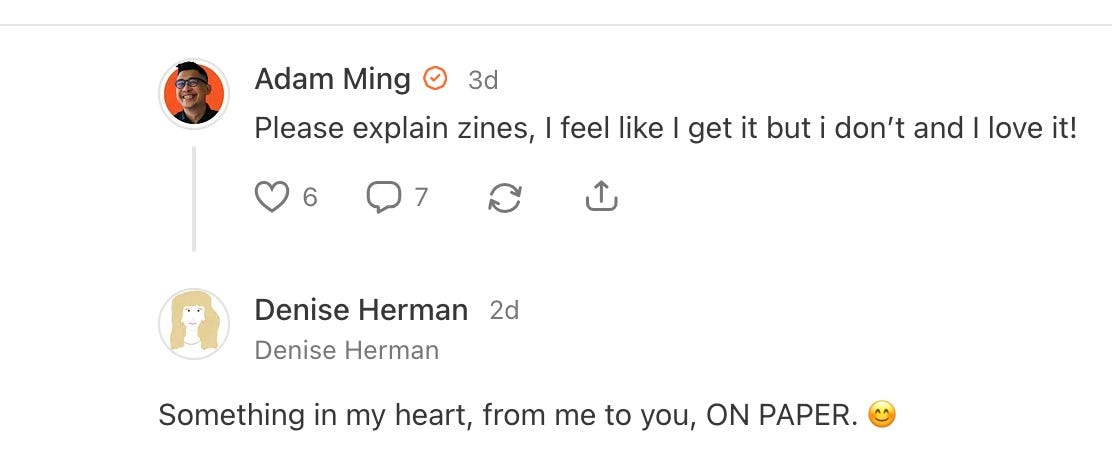
Something in my heart, from me to you, ON PAPER. I am excited to be a part of this present day zine movement and I truly hope you will make zines too! No Tech Bro extraction and intervention, no threat of suddenly removing your work, no intention to extract profit.
Just me and you, creating and talking and coming together over real human things: creativity, ideas and experiences. Truths. And as this current moment is making more and more clear, we’re going to absolutely need to come together over important human things.
Okay - so hopefully I’ve convinced you to come make zines with me, and if so, you are absolutely going to want to learn from all my first-time mistakes.
Mistake #1: Making a 24 page booklet as a first project
I was definitely overambitious to try to make such a large zine from the get-go. I didn’t really understand that you don’t have to say everything in one zine. “It’s not a magazine,” someone said too late. Not only was it harder to nail down the content at such length, but it made the learning curve so much steeper and longer!
I should have created a simple 8 page booklet first. Get all the learning and mistakes behind me before I tackled a 24-pager.
Mistake #2: Setting out to create this large zine all analog, no digital
Yes, I did want to create each page with my hands. I enjoy art-making directly with art materials, but now I know it’s not an all or nothing game. I could still create each page by hand and use a computer. This is not 1985. Computers do a few things better. Especially layout and printing.
Let me explain.
First, as you know, a book flows from front to back in page number order as you flip the pages:
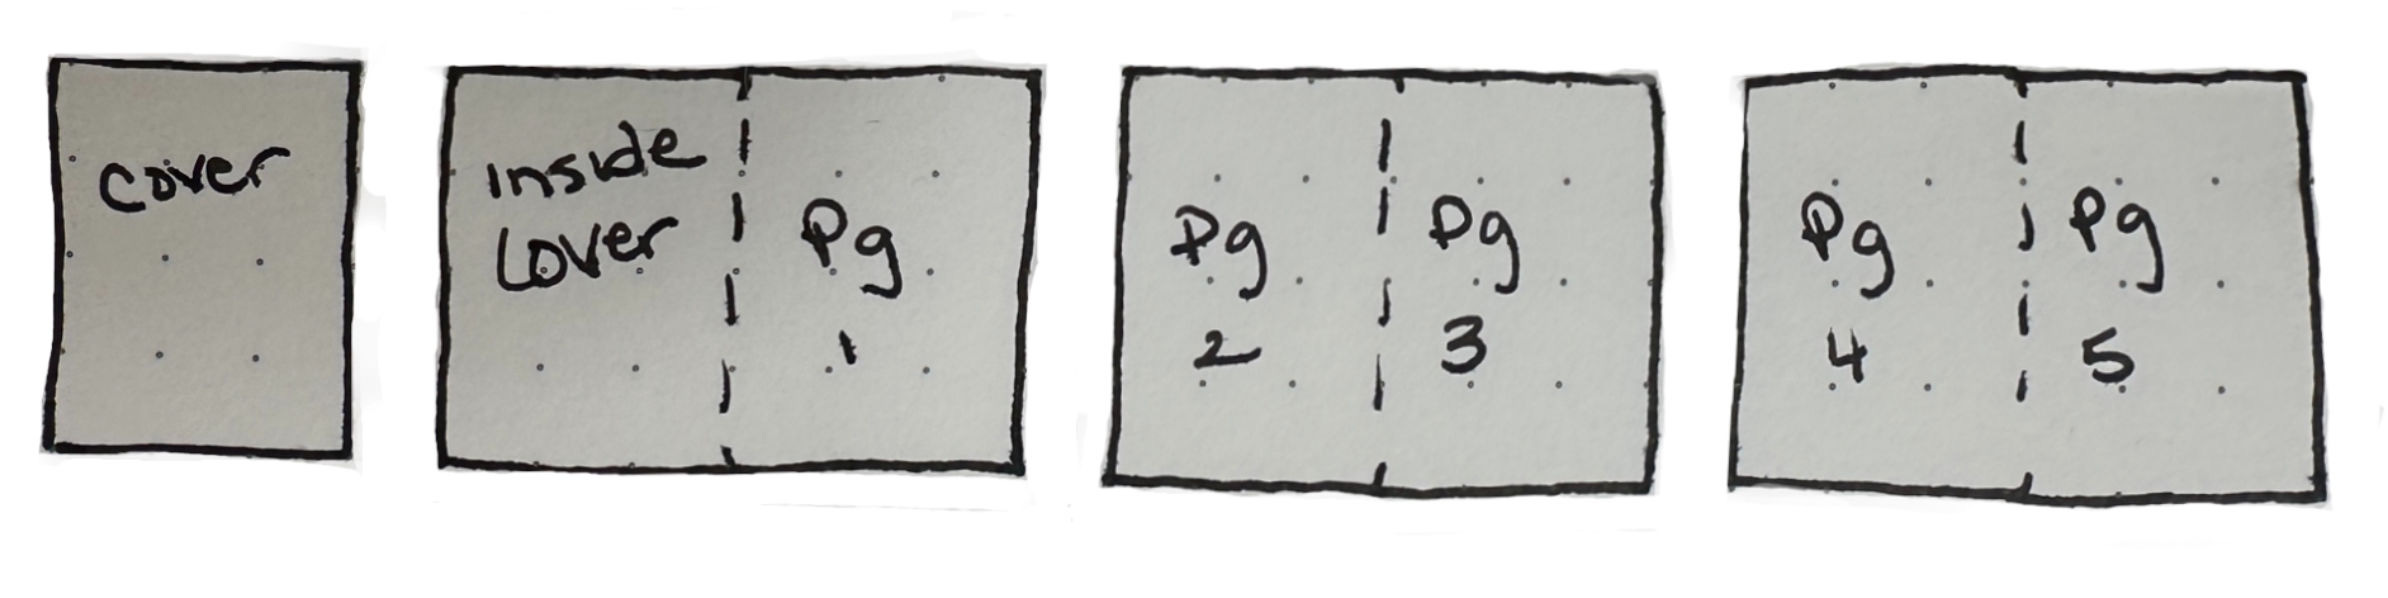
However, as you also probably know, those pages that appear in page number order when bound in a booklet are actually printed on sheets of paper that fold into one another:
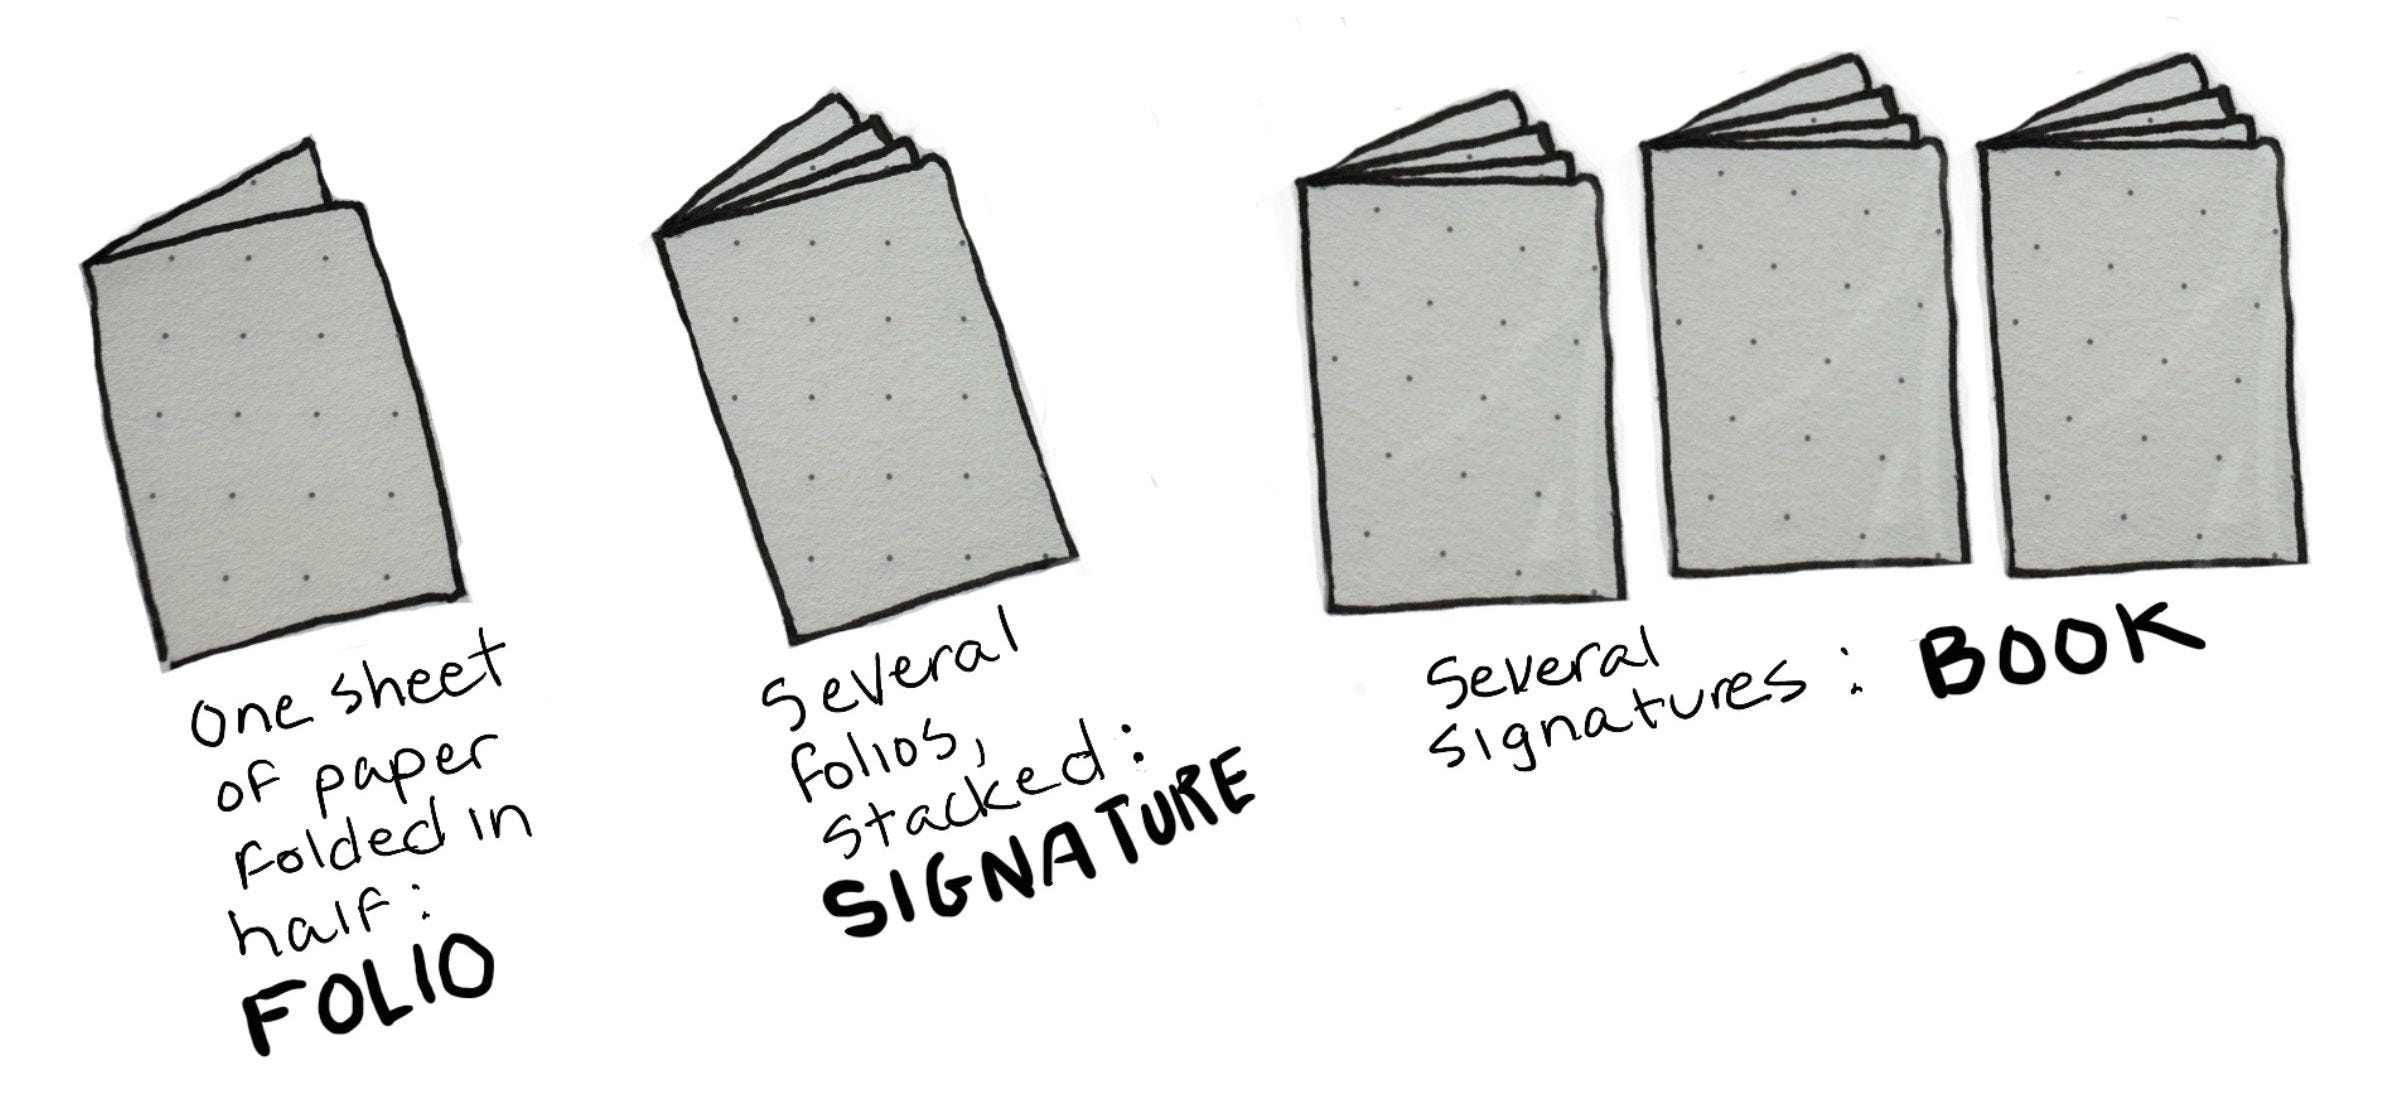
Ok, so here is where creating this zine by hand got tricky. When you unfold a signature, you will find that several pages are printed on the front and back of each folio (one sheet of paper), and page order skips around—because pages are laid out on folios in the order they will be folded in to create page order.
So let’s assume our zine is 8 1/2” x 5.5” (half standard letter sized paper). Layout for an 8 page pamphlet zine would look like this - two sheets of paper, printed front and back:
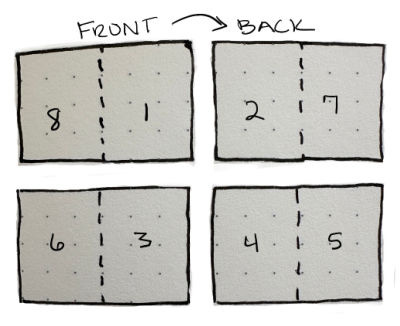
Easy enough.
Now, look at what a same half page-sized 24 page booklet layout looks like:

There are 6 folios (sheets of paper printed front and back, noted in brackets), which means 12 sides (masters) to lay out in the order they will be folded in to create page order.
HOWEVER. I did not make a half letter-sized zine. My pages are one quarter size of an 8 ½ X 11” sheet of paper (4 1/4” x 2.75”):
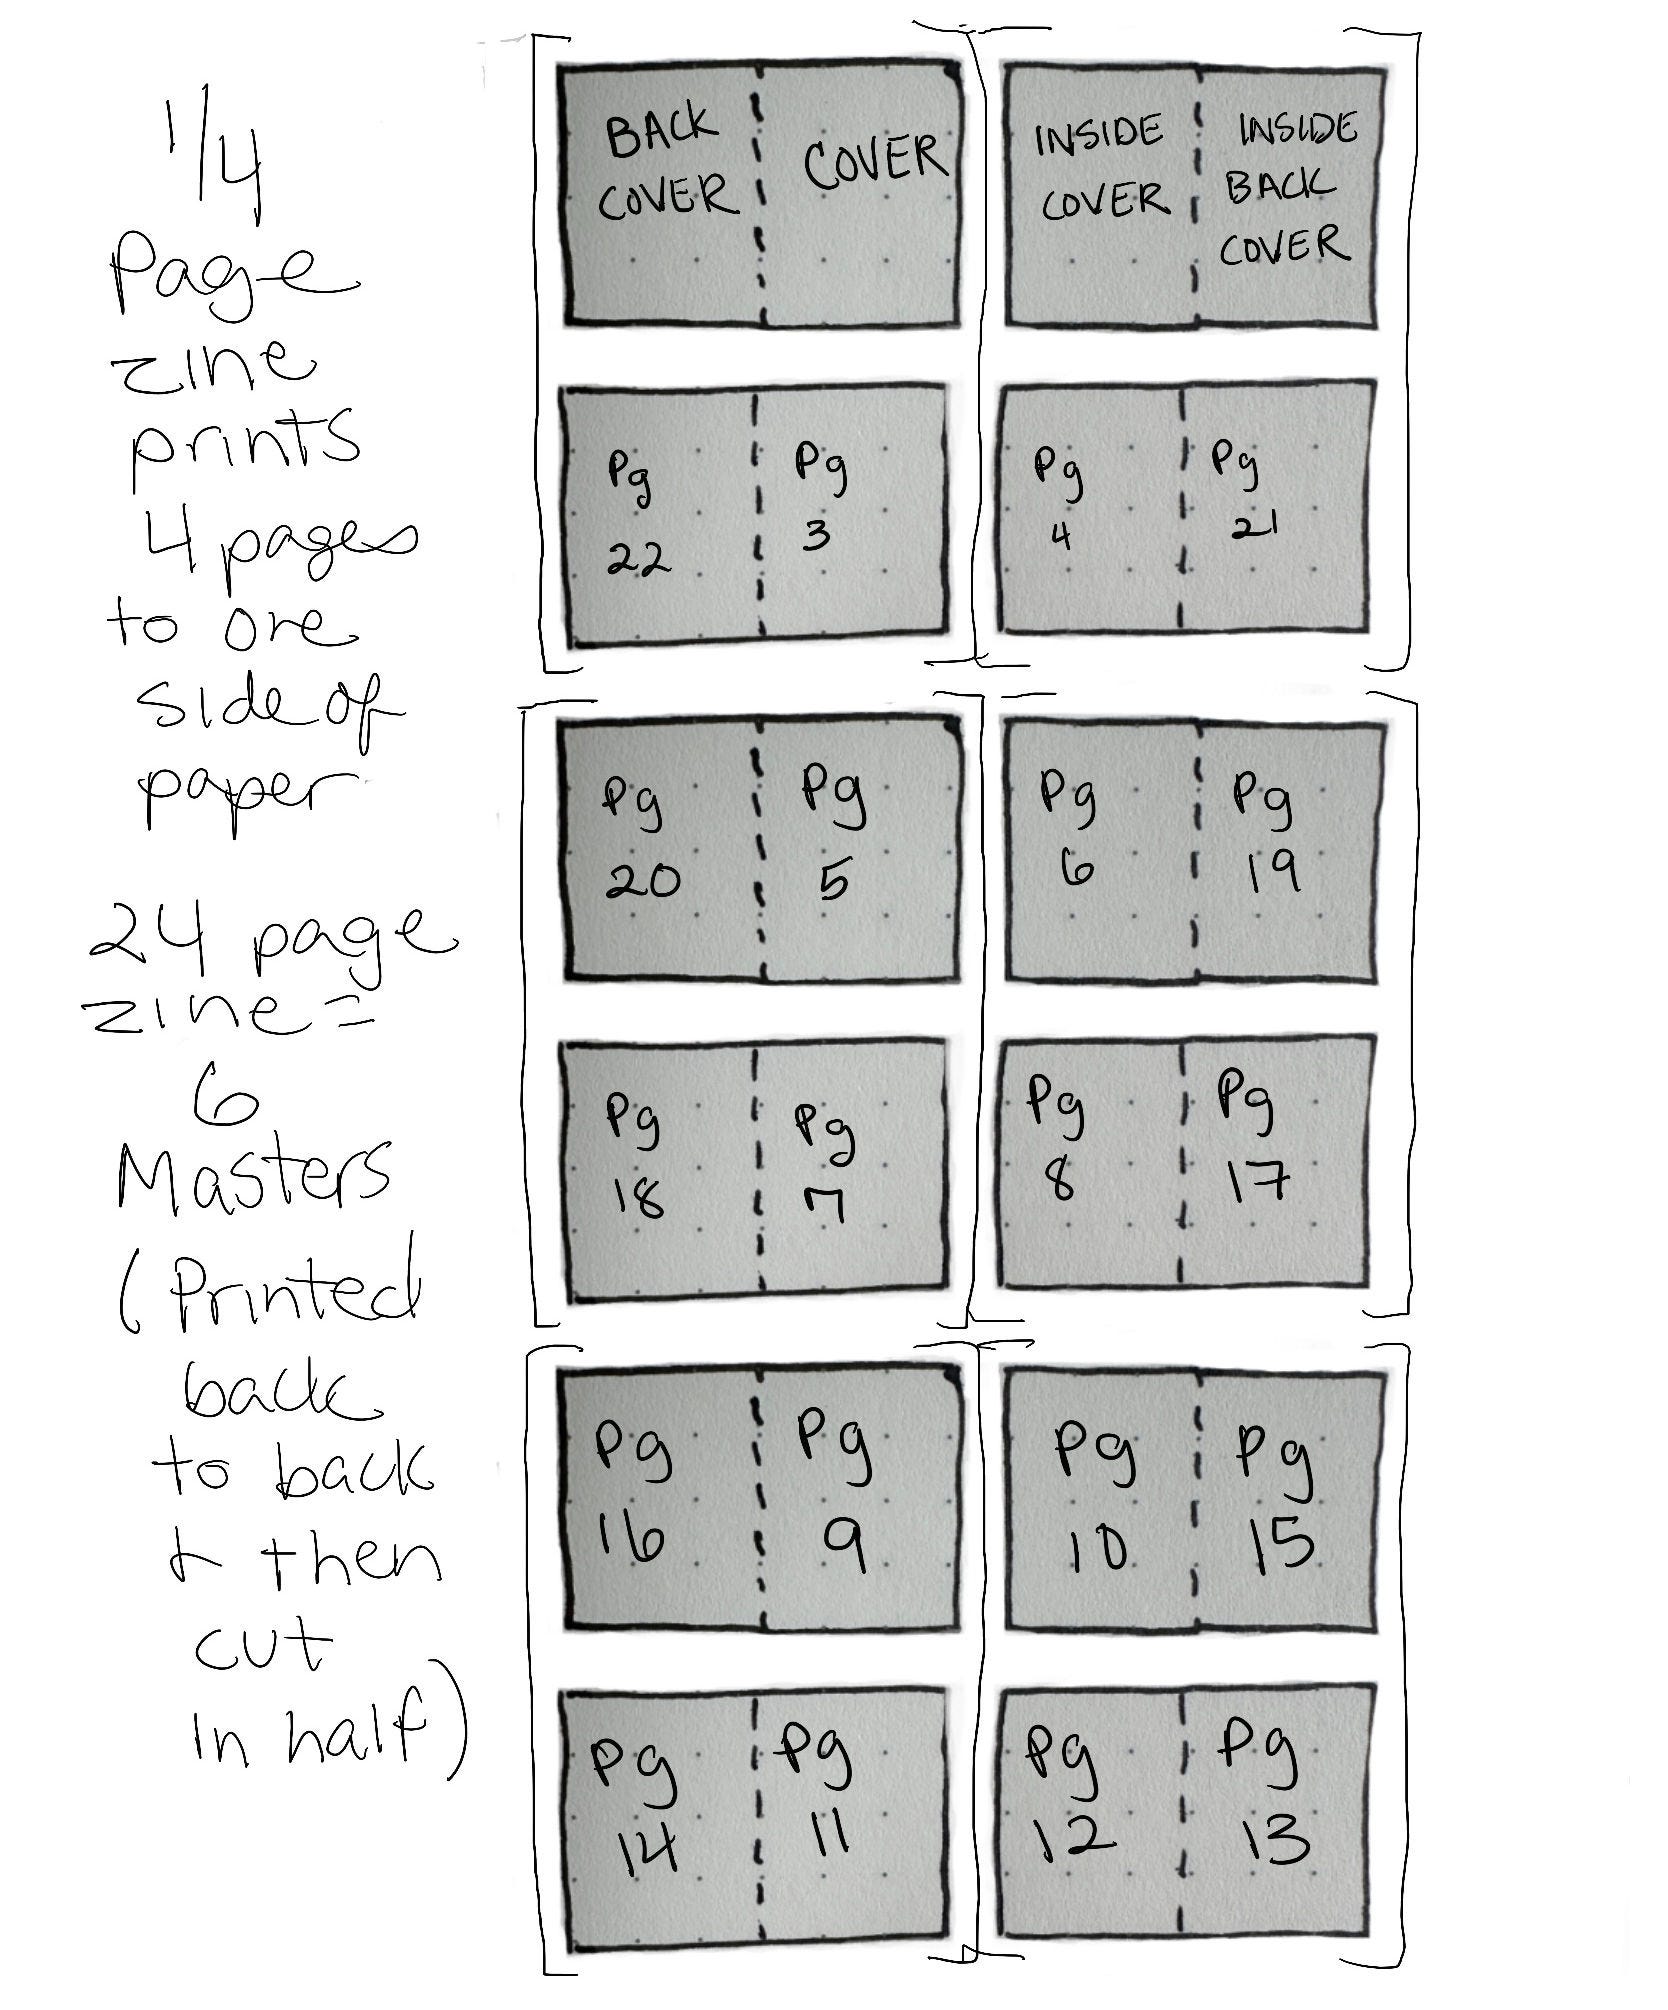
So 24 quarter-sized pages fits four pages to a side, or 6 sides printed front and back and then cut in half—again, in the order they will be folded in to create page order.
(By the way, you can easily find instructions on the internet for which page goes where for any sized zine, and yet I had to do it the hard way and figure it out myself by folding and marking pieces of scrap paper.)
I should not have created layouts on paper, but instead I should have created a 24 page zine template in a digital graphic design program (Procreate on my iPad is what I ended up using). Again, I could still create each page by hand—and I did—but planning ahead of time to scan those pages into Procreate would have saved me so much monster time—as you’ll see below.
Mistake #3: Creating each quarter-sized page on the master hard copy layout
Look back at my 24-page layout diagram above and now imagine creating each page, one by one, in those empty boxes in that layout. It was so hard to see page order flow, to remember which page went where on the grid (constantly checking my inaccurate dummy (a preliminary planning model of the zine), and I couldn’t see how facing pages of a spread would look together!
Not only that but I had also miscalculated page, gutter and margin sizes on my hard copy masters—which mean’t I needed to resize images—and I’m not even talking about last minute reorganizing of pages and other changes.
I should have created each page separately, and then scanned them into computer layout later. But even if I never touched a computer to make this zine, I still could have created each page separately and then glued them onto the paper masters. Duh!
Mistake #4: Unsystematic creative process
This mistake wins first place. My creative process was disorderly, chaotic (frustrating) and overly time consuming. Let me count the ways:
I didn’t start with a final script, so from thumbnails to dummy to creating each page directly on the masters, the script kept changing. I had WAY too many words to fit, which I found out in process, so that mean’t heavy revision as I built the zine. And as I revised the script, I needed to revise page order. But remember, I was creating directly on paper masters.
When I realized I needed to scan in my pages, both to reorder some pages and to resize all the pages (I’d miscalculated gutters and margins were wrong) I hit another problem: scans show off-white background paper and lines drawn in blue pencil (which photocopiers don’t pick up).
Not only did I have to figure out how to create a digital layout out of these six master pages, but I had to spend way too much time moving images between files and cleaning up the pages digitally.
I did find my way to a final script and final zine that I am proud of—but oh my gosh, it could have been easier!
I should have made sure my script was close to final before beginning, making most of the revision before starting.
I should have spent more time sketching and creating a rough dummy with that final script to avoid making difficult changes in the creating process.
I should have imported each separate page into digital masters for revision, probably as .pngs not jpegs to avoid background cleanup.
I hope you are taking notes! Okay, so one last mistake and if you learn this lesson you’ll save some money.
Mistake #5: Printing
Printing a multi-page zine takes trial and error on the machine as you line things up and print back to back, That’s unavoidable, and I’m sure I’ll go through the whole trial and error dance again for the next zine.
However, I also made some dumb mistakes.
I printed out the first 6 color pages on top of the second 6 color pages—instead of back to back. I should have printed my first set with a black and white test (but I believed I understood the Fed Ex clerk). I also then printed out 12 zines—and discovered 3 pages had some errors – fortunately only requiring one back to back master to fix—but still, mistakes cost money.
I should have slowed down to carefully check black and white tests first before printing in color.
So there you have it!
To summarize lessons I learned the hard way so you don’t have to (and I won’t ever again!) here we go:
Start with a smaller project—a simple 8 page booklet before launching into 24 pages.
Plan to use a digital graphic design program for layout and printing, at least for such a large project. Creating actual pages by hand is still fully available.
Make sure your script is very close to final before beginning,
Spend the time to create a rough but complete dummy with text and images before composing pages.
Definitely create each page separately for such a large zine, rather than on folio master layouts.
When printing, slow down to carefully check black and white tests first before printing in color
Choose paper ahead of time to plan for layout.
I truly hope you make some zines and this posts helps make the process easier. No more monsters, just making and trading and sharing creativity, ideas and experiences—the very important human things.
I am thoroughly enthralled by this piece. Glad zines are digging a tunnel into widespread consciousness!
Immediate fan. Immediate subscriber. I will use your diagrams to teach myself zine-ing…. and: YAY FOR YOU!